--------------------------OSPF Packets-------------------------- ...and how to turn Linux server into a Router
Hi, there!
Welcome to my humble blog.
I hope you have prepared good cookies, and a warm cup of coffee.
This is my first tutorial on low level networking.
You might be thinking why I started with OSPF - tbh, this is an old project,
and since old school is best school, why not make a nice zine out of it,
only with more details this time?! :)
Have no fear, we'll cover up in next zines the network programming from scratches
(in C and assembler) on Linux OS, and then plus the game with a bit of Big Data.
Consider this as an example of what you can do with a bit of knowledge.
Hashtag "stuff to show off with." l3l!
Shall we begin?
For this presentation, we will need a Kernel Virtual Machine (KVM).
This is the full virtualization solution for Linux,
and will make possible ssh connections from physical machine to virtual machines.
As virtual environment, Ubuntu server (14.04 or 16.04 would do just fine)
has been chosen to be set up as a router (IP 192.168.122.129).
Since we are not here to click nor to abuse the CTRL C &V,
we will manage the virtual machines from KVM's command lines.
From the core machine (the one on which the KVM is installed),
check the status of the virtual machine:
root@tron-X200A:~#virsh list
Id Name State
-------------------------------------------------------
2 Rinzler running
root@tron-X200A:~#virsh list
Log into the Virtual Machine, and define a tty file in order to use it
as a serial console. You will have to write a script under /etc/init/
For this scenario, tty0.conf file was created, with the following content:
#ttyS0 - getty
#
#
#
start on stopped rc RUNLEVEL=[2345]
stop at runlevel [!2345]
respawn
exec /sbin/getty -L 38400 ttyS0 vt102
Now, go back to the core machine, reload libvirt and
restart the virtual machine by using, the below commands
(with sudo rights):
root@tron-X200A~# sudo reload libvirt-bin
root@tron-X200A~# sudo virsh shutdown Rinzler
Domain Rinzler is being shutdown
root@tron-X200A~#sudo virsh start Rinzler
Domain Rinzler started
root@tron-X200A~#
You should be able to access the VM via ssh:
root@tron-X200A~# ssh rinzler@192.168.122.129
The authenticity of host '192.168.122.129(192.168.122.129)' can't be established
ECDSA key fingerprint is ec:8c:16:29:24:87:28:95:61:d8:0c:93:40:3b:5f:e8
Are you sure you want to contine connecting(yes/no)? yes
Warning: Permanently added '192.168.122.129' (ECDSA) to the list of known hosts
rinzler@192.168.122.129's password:
Welcome to Ubuntu 15.10(GNU/Linux 4.2.0-16-generic i686)
As a next step, towards the router set-up, I have decided to create a
virtual ethernet interface, that will represent the router’s interface.
To make this interface work, we must load the dummy kernel module.
root@Rinzler:~#
root@Rinzler:~# lsmod | grep dummy
root@Rinzler:~# modprobe dummy
root@Rinzler:~#
root@Rinzler:~# lsmod | grep dummy
dummy 16284 0
root@Rinzler:~#
After the driver is loaded, create the dummy network interface:
this interface will represent the router’s interface.
root@Rinzler:~# ip link set name virt0 dev dummy0
root@Rinzler:~# ifconfig virt0
virt0 Link encap:Ethernet HWaddr 7a:5d:48:bc:cb:29
BROADCAST NOARP MTU:1500 Metric:1
RX packets:0 errors:0 dropped:0 overruns:0 frame:0
TX packets:0 errors:0 dropped:0 overruns:0 carrier:0
collisions:0 txqueuelen:0
RX bytes:0(0.0 B) TX bytes:0 (0.0 B)
Then, create an alias, and offer an IP:
root@Rinzler:~#
root@Rinzler:~# ip addr add 192.168.122.121/24 brd * dev virt0 label virt0:0
root@Rinzler:~#
root@Rinzler:~# ifconfig -a virt0:0
virt0:0 Link encap:Ethernet HWaddr 7a:5d:48:bc:cb:29
inet addr:192.168.122.121 Bcast:192.168.122.255 Mask:255.255.255.0
BROADCAST NOARP MTU:1500 Metric:1
Perform a final check:
root@Rinzler:~# ip a | grep -w inet
inet 127.0.0.1/8 scope host lo
inet 192.168.122.129/24 brd 192.168.122.255 scope global ens3
inet 192.168.122.121/24 brd 192.168.122.255 scope global virt0:0
root@Rinzler:~#
Don`t forget to bring the interface up:
root@Rinzler:~#
root@Rinzler:~# ip link set dev virt0:0 up
root@Rinzler:~#
Set up a Linux server as an ospf router
First, install Quagga:
root@Rinzler:~# sudo apt-get install quagga
Modify the daemons under /etc/quagga/daemons file,
to their highest priority.
So, in our case, only ospfd and zebra will be set to “yes”
root@Rinzler:/etc/quagga#more daemons
#
[--------------snip-----------------]
#
zebra=yes
bgpd=no
ospfd=yes
ripd=no
ripngd=no
isisd=no
babeld=no
root@Rinzler:/etc/quagga#
Restart Quagga:
root@Rinzler:/etc/quagga#
root@Rinzler:/etc/quagga# /etc/init.d/quagga restart
[ok] Restarting quagga (via systemctl): quagga.service.
root@Rinzler:/etc/quagga#
Now go to /usr/share/doc/quagga/ and look after examples folder.
Change to that directory, and for our case we will be needing only zebra.conf.sample and
ospfd.conf.sample
Copy these two files under /etc/quagga
cp /usr/share/doc/quagga/zebra.conf.sample /etc/quagga/
cp /user/share/doc/quagga/ospfd.conf.sample /etc/quagga/
Now, add in ospfd.conf file the details of the future router:
root@Rinzler:/etc/quagga#more ospfd.conf
!
!Zebra configuration saved from vty
! 2016/05/02 03:19:13
!
hostname ospfd
password: n0tstr0ngNuff!~#@
log stdout
!
!
!
interface virt0:0
!
interface l0
router ospf
network 192.169.122.1/24 area 0.0.0.0
!
line vty
!
root@Rinzler:/etc/quagga#
Modify the zebra.conf file, as well:
root@Rinzler:/etc/quagga#
root@Rinzler:/etc/quagga# more zebra.conf
hostname Rinzler
password ****
enable password ****
!
interface ens3
ip address 192.168.122.129/24
!
root@Rinzler:/etc/quagga#
Change the files permissions:
chmod 770 /etc/quagga/zebra.conf
chmod 770 /etc/quagga/ospfd.conf
Restart Quagga:
root@Rinzler:/etc/quagga#
root@Rinzler:/etc/quagga# /etc/init.d/quagga restart
[ok] Restarting quagga (via systemctl): quagga.service.
root@Rinzler:/etc/quagga#
Activate the IP forwarding, to make possible the transfer of packets between the network
interfaces of a Linux system.
root@Rinzler:/etc/quagga#
root@Rinzler:/etc/quagga# sudo su -c "echo 1 > /proc/sys/net/ipv4/ip_forward"
root@Rinzler:/etc/quagga#
Yet, another quagga restart:
root@Rinzler:/etc/quagga#
root@Rinzler:/etc/quagga# /etc/init.d/quagga restart
[ok] Restarting quagga (via systemctl): quagga.service.
root@Rinzler:/etc/quagga#
Check from /etc/services if the following entries are present:
root@Rinzler:/etc/quagga#
root@Rinzler:/etc/quagga# more /etc/services | grep zebra
zebrasrv 2600/tcp #zebra service
zebra 2601/tcp #zebra vty
ripd 2602/tcp #ripd vty(zebra)
ripngd 2603/tcp #ripngd vty (zebra)
ospfd 2604/tcp #ospfd vty (zebra)
bgpd 2605/tcp #bgpd vty (zebra)
ospf6d 2606/tcp #ospf6d vty (zebra)
isisd 2608/tcp #ISISd vty (zebra)
root@Rinzler:/etc/quagga#
Verify that the daemons are running:
root@Rinzler:/etc/quagga#
root@Rinzler:/etc/quagga# netstat -vantu | grep 2604
tcp 0 0 127.0.0.1:2604 0.0.0.0:* LISTEN
root@Rinzler:/etc/quagga#
root@Rinzler:/etc/quagga# netstat -vantu | grep 2601
tcp 0 0 127.0.0.1:2601 0.0.0.0:* LISTEN
root@Rinzler:/etc/quagga#
Connect via telnet, to configure OSPF routing process:
root@Rinzler:~#
root@Rinzler:~# telnet localhost ospfd
Trying ::1...
Trying 127.0.0.1...
Connected to localhost.
Escape character is '^]'.
Hello, this is Quagga (version 0.99.24.1).
Copyright 1996-2005 Kunihiro Ishiguro, et al.
User Access Verification
Password:
ospf>
ospf> enable
ospf# conf terminal
ospf(config)# hostname Rinzler
Rinzler(config)#
Rinzler(config)# interface virt0:0
Rinzler(config-if)#
Rinzler(config-if)# ip
ospf OSPF interface commands
Rinzler(config-if)# ip ospf
authentication Enable authentication on this interface
... and we just got ourselves a fresh router ;-)
Briefly &theoretically, on OSPF
OSPF gathers link state information from available routers and constructs
a topology map of the network. The topology determines the routing table
presented to the Internet Layer which makes routing decisions based solely
on the destination IP address found in IP packets.
OSPF detects changes in the topology, such as link failures, very quickly
and converges on a new loopfree routing structure within seconds. It
computes the shortest path tree for each route using a method based on
Dijkstra’s algorithm a shortest path first algorithm.
OSPF encapsulates its routing messages directly on top of IP as its own
protocol type. TCP connections are not used.
Few things on IP Multicast
A typical multicast on an Ethernet network, using the TCP/IP protocol,
consists of two parts: Hardware/Ethernet multicast and IP Multicast. With
IP multicasting the hardware multicasting MAC address is mapped to an
IP Address.
Once Layer 2 (Datalink) picks the multicast packet from the network
(because it recognises it, as the destination MAC address is a multicast)
it will strip the MAC addresses off and send the rest to the above layer,
which is the Network Layer. At that point, the Network Layer needs to be
able to understand it's dealing with a multicast, so the IP address is set
in a way that allows the computer to see it as a multicast datagram.
Multicasts are used a lot between routers so they can discover each other
on an IP network.
An Open Shortest Path First (OSPF) router sends a "hello" packet to other
OSPF routers on the network. The OSPF router must send this "hello" packet
to an assigned multicast address, which is 224.0.0.5 , and the other
routers will respond.
Briefly, &theoretically on OSPF Hello packets
Hello packet (OSPF Type 1 packet) is used for neighbors discovery, and sent
periodically to a multicast group to enable dynamic discovery of neighboring routers.
All routers connected to a common network must agree on certain parameters
(Network mask, HelloInterval and RouterDeadInterval). These parameters are
included in Hello packets, so that differences can inhibit the forming of
neighbor relationships.
Go ahead and check the structure of an OSPF packet.
Move your cursor over the yellow cells - it will offer more details
on that specific field.
| Version # |
Type
1: Hello(tests reachability)
2: Database Description
3: Link Status Request
4: Link Status Update
5: Link State Acknowledgement
| Packet Length |
| Checksum |
AuthType
Authentication Type
0: no authentication
1: clear text password
2: MD5 checksum(added to end packet)
|
Auth
Authentication password:
1: 64 cleartext password
2: 0x0000(16bits)
__ KeyID(8bits)
__ Length of MD5 checksum (8bits)
__ Nondecreasing sequence number (32bit)
|
| Hello Interval |
Options |
Router Priorities |
Sending OSPF Hello packets
Now that we have our routing process up and running, let’s see what we can do from here.
Let’s check the traffic of router’s interface virt0:0 with the help of tcpdump tool
root@Rinzler:/etc/quagga# tcpdump -i virt0:0
tcpdump: verbose output suppressed, use -v or -vv for full protocol decode
listening on virt0:0, link-type EN10MB(Ethernet), capture size 262144 bytes
22:01:17.170098 IP 192.168.122.121 > ospf-all.mcast.net:OSPFv2, Hello, length 44
22:01:27.171286 IP 192.168.122.121 > ospf-all.mcast.net:OSPFv2, Hello, length 44
22:01:37.172480 IP 192.168.122.121 > ospf-all.mcast.net:OSPFv2, Hello, length 44
22:01:47.173008 IP 192.168.122.121 > ospf-all.mcast.net:OSPFv2, Hello, length 44
^C
4 packets capture
4 packets received by filter
0 packets dropped by kernel
root@Rinzler:/etc/quagga#
As you can see, we have captured four packets - the router's virt0
interface has 192.168.122.121 IP address, and is sending out Hello packet
onto multicast address for all adjacent routers.
Now, let’s try to “sneak in” few tiny crafted packets and compare results.
This is the code we'll be using(with some output from Wireshark...told ya, not low enough!)
#include <unistd.h>
#include <stdlib.h>
#include<sys/socket.h>
#include<netinet/in.h>
#include<netinet/tcp.h>
#include<netinet/ip.h>
#include<netpacket/packet.h>
#include<stdio.h>
#include<stdlib.h>
#include<errno.h>
#include<getopt.h>
#include<string.h>
#include<arpa/inet.h>
#include<stdio.h>
#include<arpa/inet.h>
#include<malloc.h>
#include<net/ethernet.h>
#include<sys/ioctl.h>
#include<net/if.h>
#include<sys/types.h>
#include<time.h>
#define MAX 300
#define ETH_P_ALL 0x0003
#define ETHSIZE 14
#define IPHSIZE 20
#define TCPHSIZE 20
typedef unsigned char BYTE;
enum _Boolean_ {FALSE=0,TRUE=1};
int create_socket(char*device)
{
int packet_socket;
struct ifreq ifr;
memset(&ifr, 0, sizeof(ifr));
struct sockaddr_ll rawsll;
memset(&rawsll, 0, sizeof(rawsll));
packet_socket=socket(PF_PACKET, SOCK_RAW, htons(ETH_P_ALL));
if(packet_socket==0)
{
printf("ERR:socket creation for device:%s\n",device);
return FALSE;
}
strncpy(ifr.ifr_name, device, sizeof(ifr.ifr_name));
if(ioctl(packet_socket, SIOCGIFINDEX,&ifr)==-1)
{
printf("ERR:ioctl failed for device:%s\n",device);
return FALSE;
}
rawsll.sll_family =AF_PACKET;
rawsll.sll_ifindex =ifr.ifr_ifindex;
rawsll.sll_protocol =htons(ETH_P_ALL);
if(bind(packet_socket, (struct sockaddr *) &rawsll, sizeof(sll))==-1)
{
printf("ERR:bind failed for device:%s\n",device);
return FALSE;
}
return packet_socket;
}
struct packet
{
struct iphdr ip;
};
unsigned short in_cksum(unsigned short *addr, int len)
{
register int sum=0;
u_short answer=0;
register u_short *w=addr;
register int nleft=len;
while (nleft>1) {
sum+=*w++;
nleft=2;
}
if(nleft==1){
*(u_char*)(&answer)=*(u_char*)w;
sum+=answer;
}
sum=(sum>>16)+(sum&0xffff);
sum+=(sum>>16);
answer=~sum;
return(answer);
}
void main(int argc, char*argv[])
{
BYTE ospf[24]={ 0x02,\
0x01,\
0x00,\
0x2c,\
0xc0,\
0xa8,\
0x67,\
0x01,\
0x00,\
0x00,\
0x00,\
0x01,\
0xb9,\
0xf8,\
0x00,\
0x01,\
0x63,\
0x69,\
0x73,\
0x63,\
0x6f,\
0x00,\
0xb9,\
0x00
};
BYTE l2[14]={ 0x01,\
0x00,\
0x5e,\
0x00,\
0x00,\
0x05,\
0xc0,\
0x01,\
0x0f,\
0x78,\
0x00,\
0x00,\
0x08,\
0x00
};
int packet_socket;
struct packet p;
memset(&p,0x0,sizeof(struct packet));
p.ip.version =4;
p.ip.ihl =IPHSIZE>>2;
p.ip.tos =0;
p.ip.tot_len =htons(24+IPHSIZE);
p.ip.id =htons(rand()%65535);
p.ip.frag_off =0;
p.ip.version =4;
p.ip.ihl =IPHSIZE>>2;
p.ip.tos =0;
p.ip.tot_len =htons(24+IPHSIZE);
p.ip.id =htons(rand()%65535);
p.ip.frag_off =0;
p.ip.ttl =htons(254);
p.ip.protocol =0x59;
p.ip.saddr =inet_addr(argv[2]);
p.ip.daddr =inet_addr("0xE0000005");
p.ip.check =(unsigned short) in_cksum((unsigned short*)&p.ip, IPHSIZE);
BYTE buf[MAX];
memcpy(buf, l2, ETHSIZE);
memcpy(buf + ETHSIZE, &p.ip, IPHSIZE);
memcpy(buf + ETHSIZE + IPHSIZE, ospf, 24);
int sock_fd = create_socket(argv[1]);
if((!packet_socket))
{
printf("no created socket!\n");
return;
}
write(packet_socket, (BYTE *)buf, ETHSIZE+ntohs(p.ip.tot_len));
printf("----packet sent-----\n");
}
Selfie time!
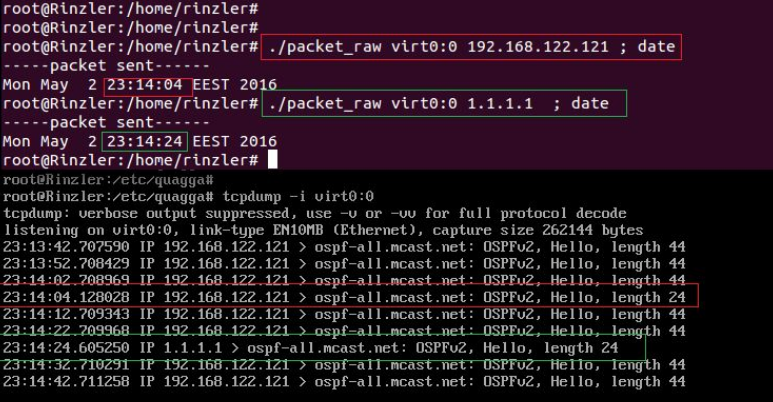 So, in first try, the router's virt0 interface with IP 192.168.122.121 is
sending out a Hello packet onto Multicast address ( ospf-all.mcast.net)
for all adjacent routers.
In second try,the router's virt0 interface with IP 1.1.1.1 is sending out
a Hello packet onto Multicast address for all adjacent routers.
As well mentioned in the IP Multicasting, in OSPF, the routers send a
"hello" packet to an assigned multicast address, which is 224.0.0.5
In our case,ospf-all.mcast.net is exactly 224.0.0.5.
This is implemented in our code at the packet structure:
p.ip.daddr = inet_addr("0xE0000005");
All these details are captured with tcpdump tool, as you can see in the
screenshot.
Now, let’s change a bit the code, and obtain a packet of OSPF version 1.
So, in first try, the router's virt0 interface with IP 192.168.122.121 is
sending out a Hello packet onto Multicast address ( ospf-all.mcast.net)
for all adjacent routers.
In second try,the router's virt0 interface with IP 1.1.1.1 is sending out
a Hello packet onto Multicast address for all adjacent routers.
As well mentioned in the IP Multicasting, in OSPF, the routers send a
"hello" packet to an assigned multicast address, which is 224.0.0.5
In our case,ospf-all.mcast.net is exactly 224.0.0.5.
This is implemented in our code at the packet structure:
p.ip.daddr = inet_addr("0xE0000005");
All these details are captured with tcpdump tool, as you can see in the
screenshot.
Now, let’s change a bit the code, and obtain a packet of OSPF version 1.
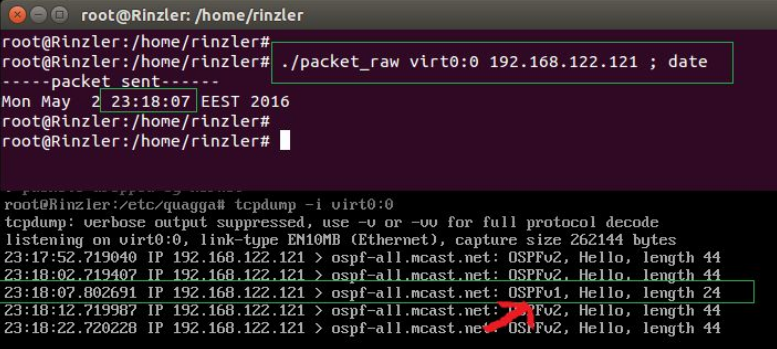 So, basically, just a very small modification had to be done
from:
BYTE ospf[24]={
0x02,\
0x01,\
-----snip-----
to:
BYTE ospf[24]={ 0x01,\
0x01,\
-----snip------
This entire experiment is based on raw packets on device level.
Packet sockets are used to receive or send raw packets at the device driver (OSI Layer 2) level,
allowing the user to implement protocol modules in user space on top of the physical layer.
...but more about these atrocities in the next zines.
-------EOF---------
So, basically, just a very small modification had to be done
from:
BYTE ospf[24]={
0x02,\
0x01,\
-----snip-----
to:
BYTE ospf[24]={ 0x01,\
0x01,\
-----snip------
This entire experiment is based on raw packets on device level.
Packet sockets are used to receive or send raw packets at the device driver (OSI Layer 2) level,
allowing the user to implement protocol modules in user space on top of the physical layer.
...but more about these atrocities in the next zines.
-------EOF---------
|